


What Are UV DTF Stickers and How Do They Work?
UV DTF stickers are pre-printed transfers made with UV-cured inks on a clear film. Unlike paper stickers or vinyl decals, there is no backing paper to peel — the design sits on the film face-down, ready to press onto any smooth hard surface. When you apply pressure and peel the carrier film back, only the cured ink layer remains on the surface, bonded directly without any visible film, edge, or adhesive residue around the design.
The application process is fast, tool-free, and requires no heat press, no squeegee, and no transfer tape. That makes UV DTF stickers one of the most beginner-friendly decoration products available — but there are still specific steps that determine whether your transfer bonds cleanly and lasts, or peels within days. This guide covers every step in detail so you get it right the first time. Once applied, always hand wash the decorated item with mild soap and lukewarm water — this is the single most important thing you can do to preserve the quality of the decoration for as long as possible.
UV DTF stickers are not the same as regular stickers. A regular sticker has a paper or vinyl face with adhesive on the back. A UV DTF transfer has no face layer — the ink itself is the graphic, and it bonds directly to the surface. The carrier film is discarded after application. To keep the finished decoration looking its best, always hand wash only — never put a UV DTF decorated item in the dishwasher.
What You Need Before You Start
UV DTF application requires almost nothing in the way of tools or equipment. That simplicity is one of its biggest advantages over vinyl decals and heat transfer products. Here is everything you need to have on hand before starting.
- Your UV DTF sticker or transfer — handle by the edges to avoid contaminating the adhesive surface
- Isopropyl alcohol (70% or 90%) — for cleaning the surface before application
- Lint-free cloth or paper towel — for wiping the surface clean and dry
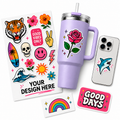
- Your substrate — tumbler, glass, acrylic panel, phone case, or any smooth hard surface
- A flat, clean workspace — good lighting helps you see alignment and air bubbles clearly
- Optional: a credit card or silicone squeegee — useful for burnishing on flat surfaces, not required for curved items
No heat press. No transfer tape. No weeding. If you're coming from vinyl or HTV, the process is significantly simpler — but surface prep is just as important. And once the transfer is applied, remember: hand wash only with mild soap to keep it looking great for as long as possible.
Best Surfaces for UV DTF Stickers
UV DTF stickers bond to smooth, non-porous hard surfaces. Before applying, confirm your substrate falls within the compatible range. Applying to an incompatible surface is the most common cause of adhesion failure regardless of how well the application technique is executed.
| Surface | UV DTF Compatible | Notes |
|---|---|---|
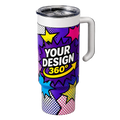
| Stainless steel tumblers (powder-coated) | Excellent | Most popular UV DTF substrate — clean surface is critical; hand wash only after decorating |
| Stainless steel (bare / brushed) | Good | Works well; ensure no oils or fingerprints remain; hand wash only |
| Glass (bottles, mugs, jars) | Excellent | Clean thoroughly — glass shows residue easily; hand wash only after applying |
| Acrylic / plexiglass | Excellent | Remove protective film first; clean surface before applying |
| Hard plastic phone cases | Good | Glossy finish works best; matte or rubberized may not hold |
| Ceramic mugs (glazed) | Good | Glazed surface bonds well; hand wash only — dishwasher will lift edges quickly |
| Aluminum (anodized or coated) | Good | Works on smooth coated aluminum; raw aluminum may vary |
| Sealed / finished wood | Fair | Must be fully sealed and smooth; raw or unfinished wood will not hold |
| Textured or matte rubberized surfaces | Not Recommended | Insufficient contact area for adhesion |
| Fabric or textiles | Not Recommended | UV DTF is not a fabric product — use DTF heat transfers instead |
| Waterproof / DWR-coated surfaces | Not Recommended | Hydrophobic coating prevents adhesive bonding |
How to Apply UV DTF Stickers: Step-by-Step
Follow these steps in order. Skipping surface prep or rushing the peel are the two most common mistakes — both are easy to avoid.
Clean the Surface Thoroughly
Apply isopropyl alcohol (70% or 90%) to a lint-free cloth and wipe the entire area where the transfer will be placed. Remove all oils, fingerprints, dust, and residue. Allow the surface to dry completely — this takes about 30–60 seconds at room temperature. Do not touch the cleaned area with bare fingers before applying the transfer. Skin oils are invisible but will compromise adhesion. This step is non-negotiable: every adhesion failure that happens "for no reason" traces back to a contaminated surface.
Trim Your Transfer if Needed
If you're working from a gang sheet, cut the individual transfers apart with scissors or a craft knife before applying. Leave a small border of clear film around each design — about 1–2mm — rather than cutting directly to the ink edge. This gives you a clean edge to grip during the peel step and helps prevent the ink layer from lifting at the corners during removal of the carrier film.
Position the Transfer
Hold the transfer with the printed side facing down — the ink layer should be against the surface, not facing you. The design will appear mirrored through the clear carrier film when you look at it from the top; this is correct. Position it precisely where you want it before making contact, because once the adhesive touches a clean surface, it grabs immediately. For tumblers and cylindrical items, use a tape measure or alignment guide to center the design horizontally and vertically before pressing down.
Press Firmly Across the Entire Design
Once positioned, press down firmly with your fingers or palm, working from the center of the design outward to the edges. Apply consistent, even pressure across the entire transfer — every part of the design must make full contact with the surface. On flat items, a credit card or silicone squeegee gives more even pressure distribution. On curved items like tumblers, use your thumb and work in small sections, pressing the film against the curve as you go. Spend at least 15–20 seconds pressing to ensure complete contact. Insufficient pressure is the second most common cause of partial transfer failure.
Peel the Carrier Film Back Slowly
Start peeling from one corner at a low angle — keep the film close to the surface as you pull it back, almost parallel to the substrate rather than pulling up at a sharp angle. Peel slowly and steadily. If any part of the design begins to lift with the carrier film instead of staying on the surface, stop immediately, press that section back down firmly, and wait 10–15 seconds before resuming. Rushing this step or peeling at a steep angle is the most frequent cause of partial or failed transfers. The slower and flatter your peel angle, the better.
Inspect and Press Down Any Lifted Edges
After the carrier film is fully removed, inspect the design closely for any lifted edges, air pockets, or sections that didn't fully transfer. If you find any, press them down firmly with your fingertip and hold for 10–15 seconds. Small edge lifts caught immediately after application almost always bond successfully when pressed back down. Edge lifts left unaddressed will grow over time and eventually cause the affected area to peel away from the surface.
Allow the Adhesive to Cure — Then Hand Wash Only
Let the finished item sit undisturbed for at least 24 hours before washing or heavy use. The adhesive continues to strengthen during this initial curing period. After 24 hours, the bond is fully set and the item can be used normally. When it comes time to clean the item, always hand wash with mild soap and lukewarm water — never put a UV DTF decorated item in the dishwasher. The high heat, harsh detergents, and prolonged water exposure of a dishwasher cycle are the fastest way to degrade the decoration. Hand washing is the single best thing you can do to keep the design looking vibrant for as long as possible.
Applying UV DTF Stickers to Tumblers and Cups
Tumblers are the most common substrate for UV DTF stickers, and the curved surface requires slightly more technique than a flat panel. Here are the specific considerations for cylindrical items. Once decorated, always hand wash your tumbler — the curved surface and design edges are particularly vulnerable to the heat and pressure of a dishwasher cycle.
Measure and Mark Your Placement
Use a tape measure to find the vertical center of the tumbler's decorating area (below the lid taper, above the base). Mark a faint horizontal line with a dry-erase marker or painter's tape as a placement guide. For horizontal centering, measure the circumference of the tumbler and divide by two to find the front center point. Good alignment marks prevent crooked placement, which cannot be corrected once the transfer is applied.
Work in Sections on Large Designs
For transfers wider than about 4 inches on a curved surface, apply from the center outward rather than pressing the entire design down at once. Press the center firmly, then work toward the left edge, then back to center and out to the right. This prevents air from getting trapped under the design as it conforms around the curve. On very wide wrap-around designs, slight wrinkles at the outer edges are normal — press them flat as you work toward each end.
Peel Extra Slowly on Curves
The peel step is more critical on curved surfaces than on flat ones. The film has to flex around the curve as you peel, which can create leverage that lifts the ink layer if you move too fast. Go slower than you think you need to — a 3-inch-wide design on a tumbler should take at least 10–15 seconds to peel. Keep your pull angle low and parallel to the surface throughout.
Troubleshooting UV DTF Application Problems
Most UV DTF problems fall into a small number of categories. Here's how to identify and fix each one.
| Problem | Most Likely Cause | Fix |
|---|---|---|
| Design lifting off with the carrier film | Insufficient pressure during application or contaminated surface | Press back down immediately, hold 15 seconds, re-peel slowly |
| Air bubbles under the design | Pressure applied too quickly or unevenly | Use a pin to pop bubble, press flat — or avoid by pressing center-out |
| Design peeling after washing | Washed in dishwasher, washed before 24-hour cure, or surface not cleaned before application | Always hand wash only with mild soap — never use the dishwasher on UV DTF decorated items |
| Edge lifting within days of application | Oil or residue at surface edges, low pressure at design perimeter, or dishwasher use | Press edges firmly with fingertip; commit to hand washing only going forward |
| Design applied crooked | No alignment guides used before pressing | Attempt removal with isopropyl alcohol and plastic scraper — prevention is better |
| Ink layer tearing during peel | Peeling at too steep an angle or too fast | Re-press the torn section; for future transfers peel low and slow |
| Transfer won't adhere at all | Incompatible surface (textured, coated, porous, or treated) | Test surface compatibility — UV DTF requires smooth, non-porous substrates |
Care Instructions After Applying UV DTF Stickers
How the item is cared for after application determines how long the transfer lasts. We strongly recommend hand washing all UV DTF decorated items — it is the single most effective way to preserve the decoration quality for as long as possible. Pass these instructions on to your customers if you're selling decorated products.
- Wait 24 hours before first use or washing to allow the adhesive to fully cure
- Hand wash only — always — use mild dish soap and lukewarm water; this is the most important care instruction for preserving the decoration as long as possible
- Never put in the dishwasher — high heat, harsh detergent, and prolonged water exposure will degrade the adhesive bond significantly faster than hand washing; even a single dishwasher cycle can begin lifting edges
- Wash gently around the graphic — avoid scrubbing directly across the surface of the design; wash around it and rinse thoroughly
- Do not use acetone, bleach, or solvent-based cleaners on or near the transfer — these dissolve the adhesive layer
- Avoid prolonged direct sunlight — extended UV exposure will fade the ink over time, especially on items left in a car or outdoors permanently
- Store unused transfers flat in a cool, dry location away from direct sunlight until ready to apply — heat and UV exposure degrade unused transfers in storage
If you're selling decorated tumblers or drinkware, include a hand wash only care card with every order. Customers who don't know to hand wash will put items in the dishwasher — and they'll blame the product, not the care. A care card sets expectations, reduces complaints, and keeps your decoration looking great on their shelf for years instead of months.
Tips for Sellers Applying UV DTF at Volume
If you're decorating products to sell — at markets, online, or for custom orders — these habits will improve consistency and reduce waste across your production process.
Batch Your Surface Prep
Clean all your blanks with isopropyl alcohol before starting application. Wipe each one down, let it air dry, and set it aside. Once you start applying transfers, your hands are occupied — having pre-cleaned blanks ready to go keeps your workflow moving without contaminating surfaces by handling them between cleaning and application.
Use a Tumbler Jig or Alignment Tool
Consistency across multiple identical tumblers requires repeatable placement. A simple DIY jig made from foam board and a tape measure guide, or a purpose-built tumbler alignment tool, eliminates the guesswork of centering each design by eye. When every unit looks identical, your product photos look professional and customer expectations are easier to meet.
Always Include a Hand Wash Care Card
Every decorated item you sell should ship with a hand wash only care card. This is not optional — it is a core part of delivering a quality product. Customers who put your decorated tumblers in the dishwasher will experience premature decoration failure and blame your work. A simple card that reads "Hand wash only with mild soap — do not dishwasher" protects your reputation, reduces refund requests, and ensures the customer enjoys the decoration for as long as possible. Print them in bulk and include one with every single order.
Order Gang Sheets to Reduce Per-Unit Cost
If you're applying multiple different designs or need small quantities of several SKUs, gang sheets are significantly more cost-effective than ordering individual transfers. The UV DTF gang sheet builder lets you nest your own designs on a single sheet and order exactly what you need with no minimums. Cut transfers apart before application and store unused ones flat for future orders.
Test Every New Blank Before a Full Run
Even within the same product category, different tumbler brands and finishes vary in how well UV DTF adheres. Before committing to a large decorated order with a new blank supplier, apply a test transfer, wait 24 hours, and perform a basic adhesion check — press tape over the design, pull it back, and see if any ink lifts. This 5-minute test saves you from decorating a full batch on a blank that won't hold.
Frequently Asked Questions
Clean the surface with isopropyl alcohol and let it dry completely. Place the transfer ink-side down onto the surface and press firmly across the entire design for 15–20 seconds, working from the center outward. Then peel the carrier film back slowly at a low angle, almost parallel to the surface. If any section lifts with the film, press it back down and wait before resuming the peel. Allow 24 hours before first use. After that, always hand wash with mild soap only — never use the dishwasher on a UV DTF decorated item.
No. UV DTF stickers are applied with hand pressure only — no heat press, no heat gun, no tools required. This is one of the key advantages over standard DTF fabric transfers and HTV vinyl, both of which require a heat press. The adhesive on UV DTF transfers is pressure-activated, not heat-activated. Firm, even hand pressure for 15–20 seconds is all that is needed for a secure bond.
The most common causes are an unclean surface, insufficient pressure, or an incompatible substrate. Oil, fingerprints, dust, or any residue on the surface will prevent adhesion even if the rest of the technique is correct. Always clean with isopropyl alcohol immediately before applying. If the surface was clean and pressure was adequate, the substrate itself may be incompatible — textured, rubberized, porous, or coated surfaces will not hold UV DTF regardless of technique.
UV DTF transfers are not designed to be repositioned after application. Once pressed down, the adhesive bonds immediately. If a transfer goes on crooked, you can attempt removal using isopropyl alcohol and a plastic scraper or credit card edge — work slowly and carefully to avoid scratching the substrate. The removed transfer cannot be reused. Prevention is far better than correction: use alignment guides and take your time positioning before making contact with the surface.
Wait a minimum of 24 hours before washing any item decorated with a UV DTF transfer. The adhesive bond continues to strengthen during this initial curing period. After the 24-hour cure, hand wash gently with mild soap and lukewarm water. We strongly recommend hand washing only for the life of the item — never put a UV DTF decorated item in the dishwasher. The high heat, harsh detergents, and prolonged soaking of a dishwasher cycle are the number one cause of premature decoration failure.
No — and we strongly recommend against it. The dishwasher is the fastest way to degrade a UV DTF decoration. High heat, harsh detergents, and extended water exposure break down the adhesive bond over time, leading to edge lifting, fading, and eventual graphic loss. Always hand wash UV DTF decorated items with mild soap and lukewarm water. This single habit will preserve the decoration quality significantly longer than any other care practice. If you're selling decorated items, include a hand wash only care card with every order.
Yes — tumblers are the most popular substrate for UV DTF stickers. The transfer film is flexible enough to conform around the curved surface of a cylindrical tumbler without wrinkling or lifting at the edges. Clean the tumbler surface with isopropyl alcohol, position carefully using a centering guide, press firmly from center outward, and peel slowly at a low angle. After application, always hand wash the tumbler with mild soap — never put it in the dishwasher, as this will degrade the decoration significantly faster than hand washing.
A regular sticker has a printed or colored face layer (paper or vinyl) with adhesive on the back — the face layer remains visible on the surface as part of the finished product. A UV DTF sticker has no face layer. The ink is printed onto a carrier film that is discarded after application. Only the cured ink layer bonds to the surface, leaving no visible film, no raised edge, and no carrier material behind. The result looks and feels more like a direct print than an applied sticker.
Tawgraphix offers both ready-to-apply UV DTF stickers and a custom UV DTF gang sheet builder that lets you upload your own designs, arrange them on a sheet, and order with no minimums. Gang sheets are the most cost-effective option when you need multiple designs or small quantities of several different graphics. Orders ship ready to apply — no additional equipment or setup required. Remember to hand wash all finished items with mild soap to preserve the decoration for as long as possible.


